Imp

Repository| Issues
The Electric Imp is a cloud and hardware solution used to connect devices to the Internet of Things .
For more information on the Imp click here.
How to Install
Install the module with:
$ npm install cylon cylon-imp
You'll also need to setup your Imp, for this you can go here: Electric Imp Getting Started
Once you have completed the Getting Started process and have a connected Imp, you need to go to the Electric Imp IDE page and create a new model that you can attach your Imp to. You can check how that process works in detail on the Electric Imp IDE docs
How to Use
Blink LED: Digital GPIO
var Cylon = require('cylon');

Cylon.robot({
  connections: {
    imp: { adaptor: 'imp', agentUrl: 'https://agent.electricimp.com/45QYZvoB41bu', module: 'cylon-imp' }
  },

  devices: {
    led: { driver: 'led', pin: 1 }
  },

  work: function(my) {
    every((1).second(), function() {
      my.led.toggle();
    });
  }
}).start()
How to Connect
We need to setup the Agent code and Device code so we can control the Imp over the internet. First we need to setup the agent that will serve as the endpoint URL for our Imp.
Setting up the Agent
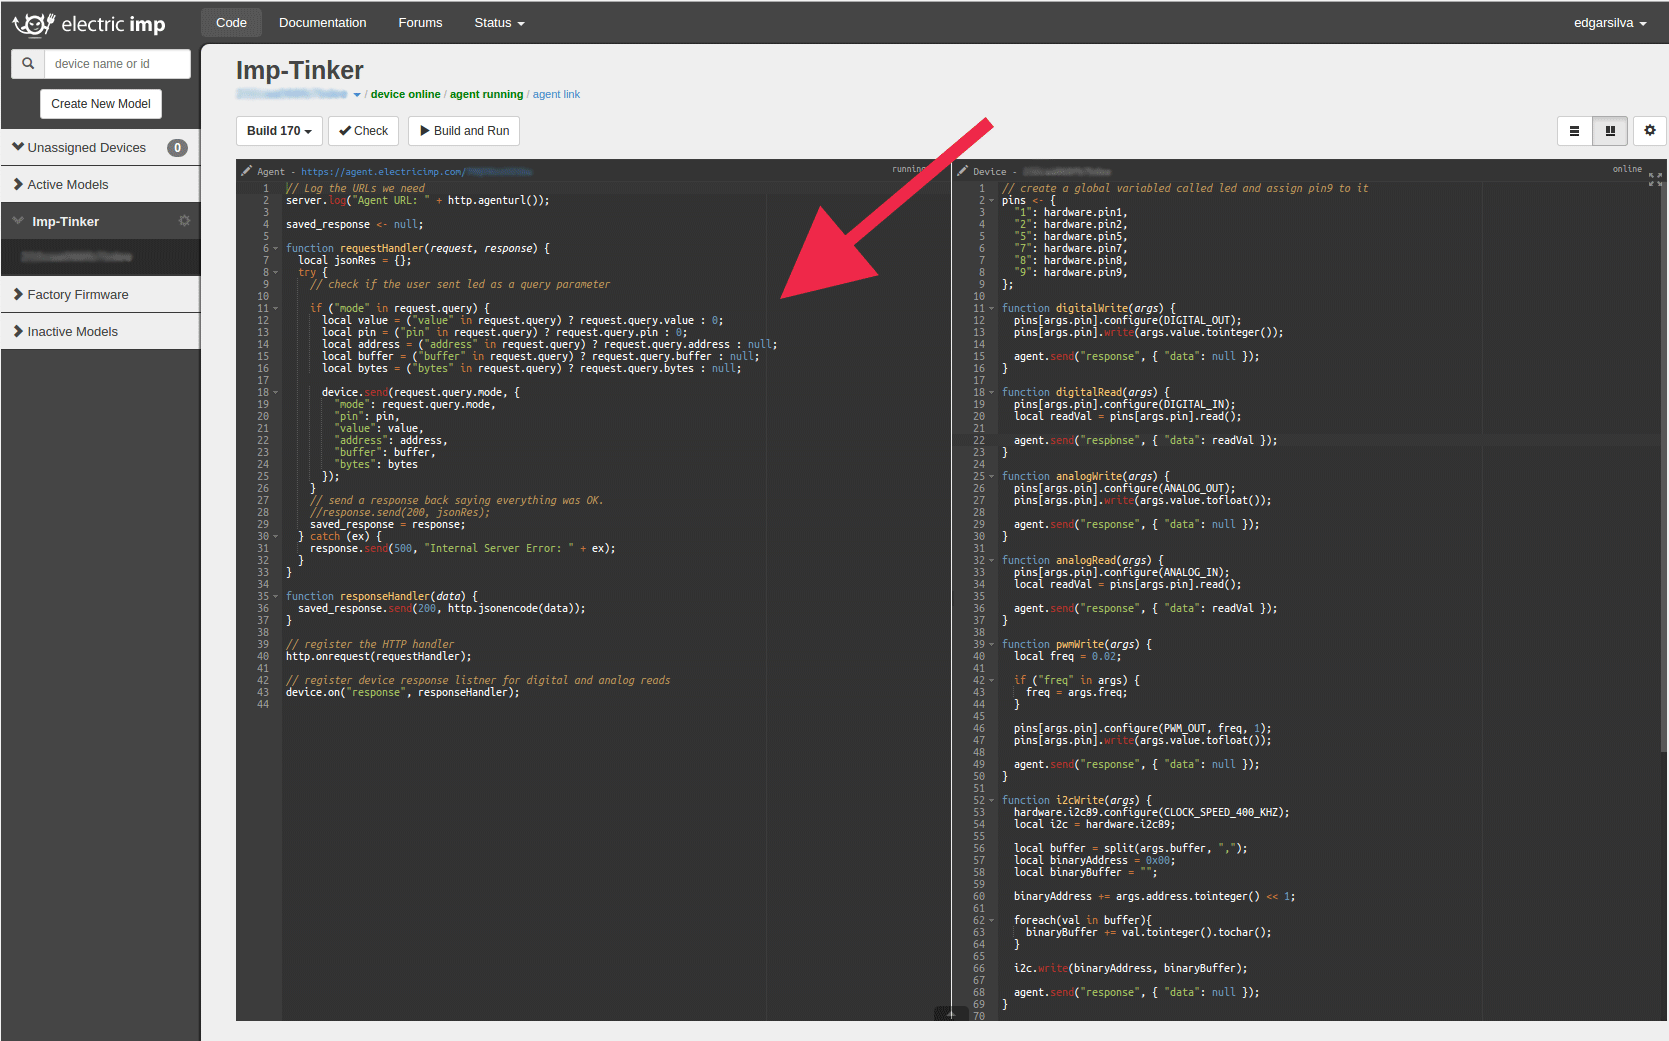
Inside the Electric Imp IDE, on the left side (for the default layout), you'll find the Agent section, you need to paste the following code:
// Log the URLs we need
server.log("Agent URL: " + http.agenturl());

saved_response <- null;

function requestHandler(request, response) {
  local jsonRes = {};
  try {
    // check if the user sent led as a query parameter

    if ("mode" in request.query) {
      local value = ("value" in request.query) ? request.query.value : 0;
      local pin = ("pin" in request.query) ? request.query.pin : 0;
      local address = ("address" in request.query) ? request.query.address : null;
      local buffer = ("buffer" in request.query) ? request.query.buffer : null;
      local bytes = ("bytes" in request.query) ? request.query.bytes : null;

      device.send(request.query.mode, {
        "mode": request.query.mode,
        "pin": pin,
        "value": value,
        "address": address,
        "buffer": buffer,
        "bytes": bytes
      })
    }
    // send a response back saying everything was OK.
    //response.send(200, jsonRes);
    saved_response = response;
  } catch (ex) {
    response.send(500, "Internal Server Error: " + ex);
  }
}

function responseHandler(data) {
  saved_response.send(200, http.jsonencode(data));
}

// register the HTTP handler
http.onrequest(requestHandler);

// register device response listener for digital and analog reads
device.on("response", responseHandler);
This will allow use to send commands to the Imp, specify modes, setup pins and consotrl I2C devices. You can also find this code in the utils section of this repo.
Setting up the Device firmware
Same as with the Agent code we do this inside the Electric Imp IDE, but now on the right side viewport, there you'll see the Device section, same as before paste the following code:
// create a global variabled called led and assign pin9 to it
pins <- {
  "1": hardware.pin1,
  "2": hardware.pin2,
  "5": hardware.pin5,
  "7": hardware.pin7,
  "8": hardware.pin8,
  "9": hardware.pin9,
};

function digitalWrite(args) {
  pins[args.pin].configure(DIGITAL_OUT);
  pins[args.pin].write(args.value.tointeger());

  agent.send("response", { "data": null });
}

function digitalRead(args) {
  pins[args.pin].configure(DIGITAL_IN);
  local readVal = pins[args.pin].read();

  agent.send("response", { "data": readVal });
}

function analogWrite(args) {
  pins[args.pin].configure(ANALOG_OUT);
  pins[args.pin].write(args.value.tofloat());

  agent.send("response", { "data": null });
}

function analogRead(args) {
  pins[args.pin].configure(ANALOG_IN);
  local readVal = pins[args.pin].read();

  agent.send("response", { "data": readVal });
}

function pwmWrite(args) {
  local freq = 0.02;

  if ("freq" in args) {
    freq = args.freq;
  }

  pins[args.pin].configure(PWM_OUT, freq, 1);
  pins[args.pin].write(args.value.tofloat());

  agent.send("response", { "data": null });
}

function i2cWrite(args) {
  hardware.i2c89.configure(CLOCK_SPEED_400_KHZ);
  local i2c = hardware.i2c89;

  local buffer = split(args.buffer, ",");
  local binaryAddress = 0x00;
  local binaryBuffer = "";

  binaryAddress += args.address.tointeger() << 1;

  foreach(val in buffer){
    binaryBuffer += val.tointeger().tochar();
  }

  i2c.write(binaryAddress, binaryBuffer);

  agent.send("response", { "data": null });
}

function i2cRead(args) {
  hardware.i2c89.configure(CLOCK_SPEED_400_KHZ);
  local i2c = hardware.i2c89;

  local buffer = split(args.buffer, ",");
  local binaryAddress = 0x00;
  local binaryBuffer = "";
  local bytesLength = args.bytes.tointeger();

  binaryAddress += args.address.tointeger() << 1;

  foreach(val in buffer){
    binaryBuffer += val.tointeger().tochar();
  }

  //i2c.write(binaryAddress, binaryBuffer);
  local data = i2c.read(binaryAddress, binaryBuffer, bytesLength)
  local dataArray = [];

  foreach(val in data) {
    dataArray.push(val);
  }

  agent.send("response", { "data": dataArray });
}

agent.on("digitalWrite", digitalWrite);
agent.on("digitalRead", digitalRead);
agent.on("analogWrite", analogWrite);
agent.on("analogRead", analogRead);
agent.on("pwmWrite", pwmWrite);
agent.on("i2cWrite", i2cWrite);
agent.on("i2cRead", i2cRead);
This will execute code in your Imp device when you make calls to the Agent using the agent URL, you can check how to do this in the following section.
Your Imp device is one click away of being ready to communicate and execute code, just click on the Build and Run button
on the top of the IDE and you should be ready to go.
Talking to your imp through the Agent URL
In order to use Cylon to communicate with your Imp we'll need the agent URL. You can find this URL right above the Agent viewport of the IDE, alternatively you can look for it in the log after you click Build and Run.
Once you have this url, which should like something along the lines of https://agent.electricimp.com/45QYZvoB41bu, you can pass it along the adaptor parameters in your Cylon code.
This is how you setup the connection using the agent url in Cylon:
var Cylon = require('cylon');

Cylon.robot({
  connections: {
    imp: { adaptor: 'imp', agentUrl: 'https://agent.electricimp.com/45QYZvoB41bu', module: 'cylon-imp' }
  },

// Rest of code ...
}).start()
Drivers
The Imp works with all GPIO and I2C drivers supported by Cylon.