Connect Salesforce to Intel Edison In 60 Lines Of JavaScript
Welcome! In this workshop, we're going to show you how to create a Salesforce connected device, using the brand new Intel Edison, in 60 lines of JavaScript. Plus we're going to have some fun too.
Getting Started
- We have provided an Intel Edison with Arduino Breakout Board, 2 USB Cables, and a Grove Starter Kit to participate in this workshop.
- We have already plugged in each Intel Edison to the workshop computers, so they are ready for you to use.
- The computers in the workshop area also already have pre-installed the Intel XDK (Cross-platform Developer Kit) IoT Edition, and the needed drivers for Microsoft Windows.
- Get started by running the "Intel XDK IoT Edition" program.
- The dialog "Please log into Intel XDK" will be displayed. You will need to register for an account, or else sign in using your existing Intel XDK account, if you have one.
- That's it, now you are ready to get going!
Create a Blank Project
- First, we need to create a new project. Choose "New Project".
- Click on "Start With A Sample Or Template" in the "Internet Of Things (IoT) with Node.js Projects.
- Click on "Blank Template", and then click on "Use This Template".
- Enter in a name for this project, such as "df14", then click on the "Create" button.
-
Click on the file named "package.json". The file will open in the XDK editor. Copy the following code, and paste into your editor, replacing all of the code already in the "package.json" file:
package.json
{ "name": "blankapp", "description": "", "version": "0.0.1", "main": "main.js", "engines": { "node": ">=0.10.0" }, "dependencies": { "cylon-intel-iot": "*" } } - You will need to connect to your Edison board from your computer to send code to it. Choose the "Add Manual Connection" from the "IoT Device" menu located at the bottom right. Enter "192.168.2.15" for the Address, and "58888" for the Port. Click on the "Connect" button to save your connection.
Blinking LED
Let's start with the 'Hello, World' of the Internet of Things: making an LED blink.
-
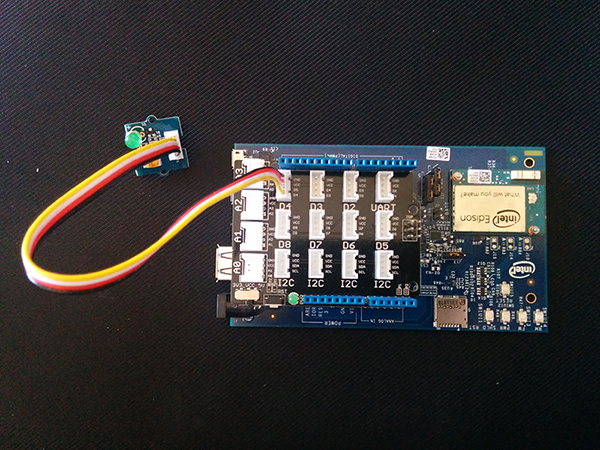
Plug the LED that is included with the Grove Starter Kit into the jack labeled 'D4', like this:
-
Enter the following code into the Intel XDK editor into the file named "main.js", replacing everything in the file:
main.js
var Cylon = require('cylon');

Cylon
  .robot()
  .connection('edison', { adaptor: 'intel-iot' })
  .device('led', { driver: 'led', pin: 4, connection: 'edison' })
  .on('ready', function(my) {
    setInterval(function() {
      my.led.toggle();
    }, 1000);
  });

Cylon.start();
-
Click on the "Install/Build" icon located at the bottom of the XDK editor. This will install the needed Cylon.js software on the Edison, as well as copying your code.
-
Now, click on the "Run" icon located at the bottom of the XDK editor.
The Cylon.js program will execute on the Edison itself, and will make the LED turn on/off every second.
LED + Touch Sensor
Now, let's add a digital touch sensor, so you can control when the LED turns on or off yourself.
-
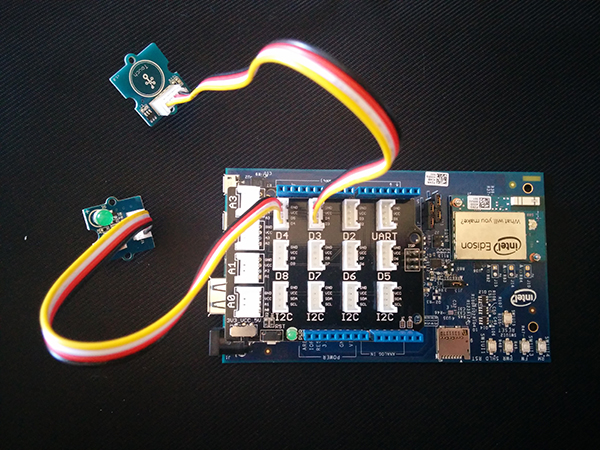
Leave the LED plugged in, and plug in the touch sensor that is included with the Grove Starter Kit, into the jack labeled 'D3', like this:
-
Now, enter this code into the Intel XDK editor for the file "main.js", replacing everything:
main.js
var Cylon = require('cylon');

Cylon
  .robot()
  .connection('edison', { adaptor: 'intel-iot' })
  .device('led', { driver: 'led', pin: 4, connection: 'edison' })
  .device('touch', { driver: 'button', pin: 3, connection: 'edison' })
  .on('ready', function(my) {
    my.touch.on('press', function() {
      my.led.turnOn();
    });

    my.touch.on('release', function() {
      my.led.turnOff();
    });
  });

Cylon.start();
-
Click on the "Run" icon located at the bottom of the XDK editor.
Once the program is running, you should be able to turn the LED on or off, by touching the sensor with your finger.
Salesforce + LED + Touch Sensor
Now, we're ready to connect our device to Salesforce. Leave the touch sensor and LED plugged in. All we will need is to change the Cylon.js program to connect our device to the Salesforce Apex & Streaming APIs.
-
Enter this code into the Intel XDK editor, replacing all of the previous code in the "main.js" file:
main.js
var Cylon = require('cylon');
var robotName = 'cylon01';
var username = 'user';
var password = 'password';
// Paste Cylon.js robot code below this line

Cylon
  .robot({ name: robotName })

  .connection('edison', { adaptor: 'intel-iot' })
  .connection('sfcon', { adaptor: 'force', sfuser: username, sfpass: password })

  .device('salesforce', { driver: 'force', connection: 'sfcon' })
  .device('led', { driver: 'led', pin: 4, connection: 'edison' })
  .device('touch', { driver: 'button', pin: 3, connection: 'edison' })

  .on('ready', function(my) {
    my.salesforce.subscribe('BoardMsgOutbound', function(err, data) {
      if (err != null) {
        console.log(err);
      } else if (data.sobject.board_id__c === my.name) {
        if (data.sobject.touch_sensor__c === true) {
          my.led.turnOn();
        } else if (data.sobject.touch_sensor__c === false) {
          my.led.turnOff();
        }
      }
    });

    my.touch.on('press', function() {
      var toSend = {
        boardId: my.name,
        touchSensor: true
      };

      my.salesforce.post('/Boards/', toSend, function(err, data) {
        if (err != null) {
          console.log("Error sending touch sensor information: " + err);
        } else {
          console.log('Board Msg has been sent to Salesforce.');
        }
      });
    });

    my.touch.on('release', function() {
      var toSend = {
        boardId: my.name,
        touchSensor: false
      };
      my.salesforce.post('/Boards/', toSend, function(err, data) {
        if (err != null) {
          console.log("Error sending touch sensor information: " + err);
        } else {
          console.log('Board Msg has been sent to Salesforce.');
        }
      });
    });
  });
Cylon.start();
-
At the top of the "main.js" file, change the "robotName" variable located at line 2 to the name written on your Edison box, for example "cylon1".
-
Also, change the "username" and "password" located at line 3 and 4 to the Salesforce username and password you have been given to use for this workshop.
-
You will need to add the "cylon-force" module to your "package.json" as well. Replace the entire file's contents with this code:
package.json
{ "name": "blankapp", "description": "", "version": "0.0.1", "main": "main.js", "engines": { "node": ">=0.10.0" }, "dependencies": { "cylon-intel-iot": "*", "cylon-force": "*" } } -
Click on the "Run" icon located at the bottom of the XDK editor.
Once the program is running, now when you press the sensor, it communcates with the Salesforce cloud, and then turns the LED on or off, when the Salesforce API sends an update to the device.
Salesforce + LED + Touch Sensor + Analog Sensor
Now, let's add an 'analog sensor'. An analog sensor allows you to have not just an 'on or off' signal, but actually send a range, like the control dial on a thermostat.
-
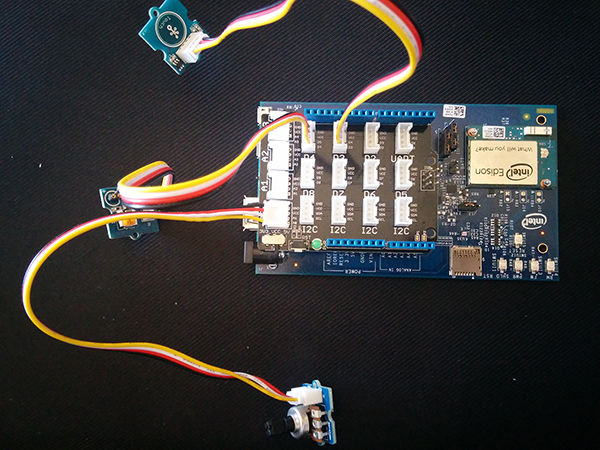
Plug in the knob labeled "Rotation" that is included with the Grove Starter Kit into the jack labeled 'A0', like this:
-
Instead of replacing all of the "main.js" file, copy this code and paste into the editor underneath the comment "Paste Cylon.js robot code below this line". Please note that you need to replace the previous code below this comment, while leaving in the "robotName", "username", and "password" values from before.
JavaScript
Cylon .robot({ name: robotName }) .connection('edison', { adaptor: 'intel-iot' }) .connection('sfcon', { adaptor: 'force', sfuser: username, sfpass: password }) .device('salesforce', { driver: 'force', connection: 'sfcon' }) .device('led', { driver: 'led', pin: 4, connection: 'edison' }) .device('touch', { driver: 'button', pin: 3, connection: 'edison' }) .device('sensor', { driver: 'analogSensor', pin: 0, connection: 'edison' }) .on('ready', function(my) { var ready = false; var sensorVal = 0; my.salesforce.subscribe('BoardMsgOutbound', function(err, data) { if (err != null) { console.log(err); } else if (data.sobject.board_id__c === my.name) { if (data.sobject.touch_sensor__c === true) { my.led.turnOn(); } else if (data.sobject.touch_sensor__c === false) { my.led.turnOff(); } var sensor = data.sobject.analog_sensor__c; if (sensor != null) { console.log("Reading: " + sensor); } } }); my.touch.on('press', function() { ready = true; var toSend = { boardId: my.name, touchSensor: true }; my.salesforce.post('/Boards/', toSend, function(err, data) { if (err != null) { console.log("Error sending touch sensor information: " + err); } else { console.log('Board Msg has been sent to Salesforce.'); } }); }); my.touch.on('release', function() { ready = false; var toSend = { boardId: my.name, touchSensor: false }; my.salesforce.post('/Boards/', toSend, function(err, data) { if (err != null) { console.log("Error sending touch sensor information: " + err); } else { console.log('Board Msg has been sent to Salesforce.'); } }); }); my.sensor.on('analogRead', function(data) { sensorVal = data; }); setInterval(function() { if (ready) { var toSend = { boardId: my.name, touchSensor: true, analogSensor: sensorVal }; my.salesforce.post('/Boards/', toSend, function(err, data) { if (err != null) { console.log("Error sending analog sensor information: " + err); } }); } }, 2000); }) .start(); -
Click on the "Run" icon located at the bottom of the XDK editor.
Once the program is running, when you touch the touch sensor from before, you can adjust the value by turning the dial to send a new value to Salesforce every 2 seconds. Both data sources are going thru Salesforce!
Salesforce + LED + Button + Analog Sensor + LCD Display
Finally, let's add a backlit LCD display, so we can display some useful data on the device itself.
-
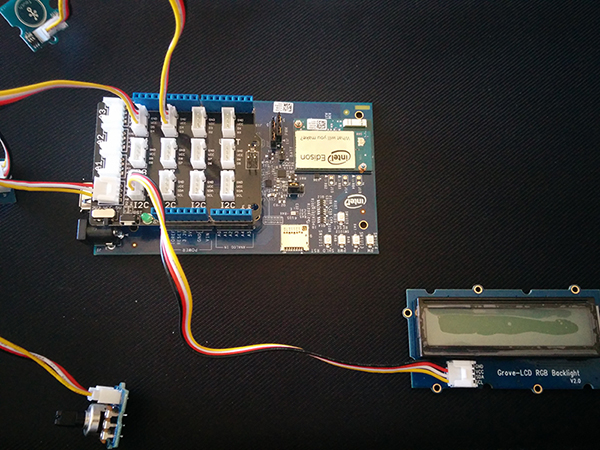
Plug in the LCD Display that is included with the Grove Starter Kit into the jack labeled 'I2C', like this:
-
Instead of replacing all of the "main.js" file, copy this code and paste into the editor underneath the comment "Paste Cylon.js robot code below this line". Once again, please note that you need to replace the previous code below this comment, while leaving in the "robotName", "username", and "password" values from earlier.
main.js
function writeToScreen(screen, message) {
  screen.setCursor(0,0);
  screen.write(message);
}

Cylon
  .robot({ name: robotName })

  .connection('edison', { adaptor: 'intel-iot' })
  .connection('sfcon', { adaptor: 'force', sfuser: username, sfpass: password})

  .device('salesforce', { driver: 'force', connection: 'sfcon' })
  .device('led', { driver: 'led', pin: 4, connection: 'edison' })
  .device('touch', { driver: 'button', pin: 3, connection: 'edison' })
  .device('sensor', { driver: 'analogSensor', pin: 0, connection: 'edison' })
  .device('screen', { driver: 'upm-jhd1313m1', connection: 'edison' })

  .on('ready', function(my) {
    var ready = false;
    var sensorVal = 0;

    writeToScreen(my.screen, "Ready!");

    my.salesforce.subscribe('BoardMsgOutbound', function(err, data) {
      if (err != null) {
        console.log(err);
      } else if (data.sobject.board_id__c === my.name) {
        if (data.sobject.touch_sensor__c === true) {
          my.led.turnOn();
        } else if (data.sobject.touch_sensor__c === false) {
          my.led.turnOff();
        }
        var sensor = data.sobject.analog_sensor__c;
        if (sensor != null) {
          var pad = "0000";
          var message = "Reading: " + (pad+sensor.toString()).slice(-pad.length);
          writeToScreen(my.screen, message);
          console.log(message);
        }
      }
    });

    my.touch.on('press', function() {
      ready = true;
      var toSend = {
        boardId: my.name,
        touchSensor: true
      };
      my.salesforce.post('/Boards/', toSend, function(err, data) {
        if (err != null) {
          console.log("Error sending touch sensor information: " + err);
        } else {
          console.log('Board Msg has been sent to Salesforce.');
        }
      });
    });

    my.touch.on('release', function() {
      ready = false;
      var toSend = {
        boardId: my.name,
        touchSensor: false
      };
      my.salesforce.post('/Boards/', toSend, function(err, data) {
        if (err != null) {
          console.log("Error sending touch sensor information: " + err);
        } else {
          console.log('Board Msg has been sent to Salesforce.');
        }
      });
    });

    my.sensor.on('analogRead', function(data) {
      sensorVal = data;
    });

    setInterval(function() {
      if (ready) {
        var toSend = {
          boardId: my.name,
          touchSensor: true,
          analogSensor: sensorVal
        };
        my.salesforce.post('/Boards/', toSend, function(err, data) {
        if (err != null) {
          console.log("Error sending analog sensor information: " + err);
        }
        });
      }
    }, 2000);
  })
  .start();
Once the program is running, the values that you change by moving the dial, will be displayed on the LCD display. As before, you must be touching the touch sensor, in order to move the dial.
Wrap Up
That concludes this workshop. You've just connected the Intel Edison to 4 different devices and the Salesforce Apex & Streaming APIs. Great job!
